mNo edit summary Tag: Visual edit |
mNo edit summary Tag: Visual edit |
||
| Line 1: | Line 1: | ||
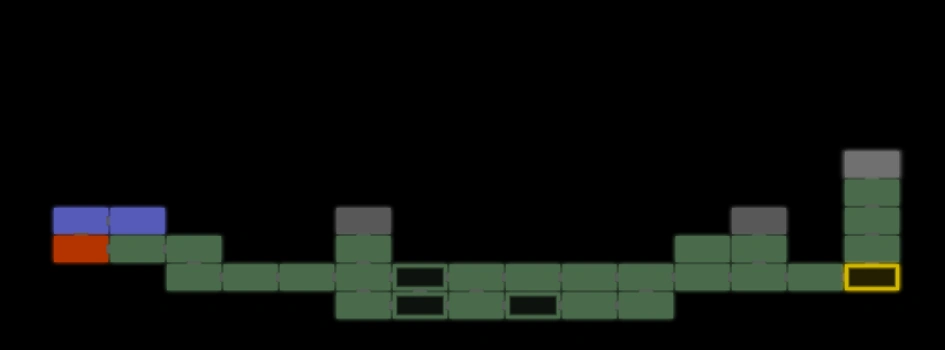
[[File:MP Dungeon 2 Map.png|thumb|220x220px|Dungeon Map]] |
[[File:MP Dungeon 2 Map.png|thumb|220x220px|Dungeon Map]] |
||
| − | '''"The search for the magic"''' is the second official multiplayer map, and is recommended for |
+ | '''"The search for the magic"''' is the second official multiplayer map, and is recommended for 3 players, Lv. 3 - 4. |
Within this dungeon, the players will acquire their first spellbooks and spellcasting-related equipment. |
Within this dungeon, the players will acquire their first spellbooks and spellcasting-related equipment. |
||
| Line 8: | Line 8: | ||
[[File:Search-for-magic-trap1-triggered.png|thumb|220x220px|Sometimes, you actually WANT to be by the lever.]] |
[[File:Search-for-magic-trap1-triggered.png|thumb|220x220px|Sometimes, you actually WANT to be by the lever.]] |
||
Trap #1 is a lever trap that will drop a long row of stones on the players.''' '''The dungeon tries to fool you with a row of stones directly over the lever, but the trap is actually a row of stones that is not immediately visible, positioned directly over the area where you access the lower part of the room. All players should stand on the lever platform when it is pulled. '''This lever must be pulled in order to progress.''' |
Trap #1 is a lever trap that will drop a long row of stones on the players.''' '''The dungeon tries to fool you with a row of stones directly over the lever, but the trap is actually a row of stones that is not immediately visible, positioned directly over the area where you access the lower part of the room. All players should stand on the lever platform when it is pulled. '''This lever must be pulled in order to progress.''' |
||
| ⚫ | |||
| − | |||
Trap #2 is a lever trap with multiple levers; any of the three will activate the two traps overhead.''' '''One trap is three falling rocks, and the other is a rolling boulder that will roll rightwards, over the gap and out the right entrance of the map. The central lever is safe, as both traps will outright miss you. The right lever puts you in the path of the boulder, which you will not be able to avoid; the left one is directly beneath the falling rocks, leading again to unavoidable death. '''This trap may be skipped.''' |
Trap #2 is a lever trap with multiple levers; any of the three will activate the two traps overhead.''' '''One trap is three falling rocks, and the other is a rolling boulder that will roll rightwards, over the gap and out the right entrance of the map. The central lever is safe, as both traps will outright miss you. The right lever puts you in the path of the boulder, which you will not be able to avoid; the left one is directly beneath the falling rocks, leading again to unavoidable death. '''This trap may be skipped.''' |
||
== Loot == |
== Loot == |
||
There is some significant loot to be found outside the final loot chamber, specifically in a handful of side areas that can be missed or skipped. |
There is some significant loot to be found outside the final loot chamber, specifically in a handful of side areas that can be missed or skipped. |
||
| + | |||
| ⚫ | |||
The first loot area is accessed by killing all the sea snakes within Room #11; two of the snakes are on a central, unreachable platform and must be killed with ranged attacks or spells. Once all snakes in the room are dead, a ladder will make the central platform reachable; from there you climb a long platform ladder up to a room containing four chests, a number of barrels, and three scroll stands, one of which will contain a Lv 4 spell or skill book. All chests and the book stand drop one item for all party members. Beware: the walking armor in this room is quite dangerous and will take an inordinate amount of damage before going down. It can, however, drop a suit of Plate armor for one player. |
The first loot area is accessed by killing all the sea snakes within Room #11; two of the snakes are on a central, unreachable platform and must be killed with ranged attacks or spells. Once all snakes in the room are dead, a ladder will make the central platform reachable; from there you climb a long platform ladder up to a room containing four chests, a number of barrels, and three scroll stands, one of which will contain a Lv 4 spell or skill book. All chests and the book stand drop one item for all party members. Beware: the walking armor in this room is quite dangerous and will take an inordinate amount of damage before going down. It can, however, drop a suit of Plate armor for one player. |
||
The second loot area requires a bit of backtracking. Once you've passed the room full of frogs, and climbed upwards, head to the left instead of the right. After a bit of platforming, you'll encounter a long ladder leading up to an armory. Inside there are four chests, and a door leading to a back area. Within the back area you'll find a guaranteed wand and ring, along with the highly desirable '''Architect's Tools''', which allow you to create your own dungeons. The tools are a floating green symbol in the air; simply jump and touch that symbol to unlock them for your current character. |
The second loot area requires a bit of backtracking. Once you've passed the room full of frogs, and climbed upwards, head to the left instead of the right. After a bit of platforming, you'll encounter a long ladder leading up to an armory. Inside there are four chests, and a door leading to a back area. Within the back area you'll find a guaranteed wand and ring, along with the highly desirable '''Architect's Tools''', which allow you to create your own dungeons. The tools are a floating green symbol in the air; simply jump and touch that symbol to unlock them for your current character. |
||
| + | |||
| ⚫ | |||
The third loot area is designated a kitchen, and is up the long ladder just before the boss chamber. Within you'll find coffins for respawning, a chest containing six hunks of Magic Cheese, and barrels with assorted contents. |
The third loot area is designated a kitchen, and is up the long ladder just before the boss chamber. Within you'll find coffins for respawning, a chest containing six hunks of Magic Cheese, and barrels with assorted contents. |
||
The final loot chamber, after beating the boss, is where most of the money here is. Within you'll find 1 Amethyst Dolphin, a chest with a random robe, a chest with a random staff, a chest with a guaranteed unique wand, a ring, and of course, two random Lv 4 books. If you acquired the Red Key, an additional chamber can be opened, containing two rings, another robe and staff, and two more Lv 4 books. The barrels found within both chambers contain some of every flavor of Magic Essence. |
The final loot chamber, after beating the boss, is where most of the money here is. Within you'll find 1 Amethyst Dolphin, a chest with a random robe, a chest with a random staff, a chest with a guaranteed unique wand, a ring, and of course, two random Lv 4 books. If you acquired the Red Key, an additional chamber can be opened, containing two rings, another robe and staff, and two more Lv 4 books. The barrels found within both chambers contain some of every flavor of Magic Essence. |
||
| + | |||
| ⚫ | |||
| + | <gallery> |
||
| + | Search-for-magic-lootroom-3.png |
||
| + | Search-for-magic-lootroom-1.png |
||
| + | </gallery> |
||
| + | [[File:Search-for-magic-loot2b.png|thumb|220x220px]] |
||
| + | [[File:Search-for-magic-bossloot.png|thumb|220x220px]] |
||
== Other Features == |
== Other Features == |
||
The dungeon contains other features that aren't entirely traps; one is a room where, upon pulling a lever, a multitude of frogs will fall from the sky and begin attacking. This is easily handled by a martial character, a well placed Arcane Wave, or simply using the bombs you were given a few screens earlier to prepare traps for the frogs. |
The dungeon contains other features that aren't entirely traps; one is a room where, upon pulling a lever, a multitude of frogs will fall from the sky and begin attacking. This is easily handled by a martial character, a well placed Arcane Wave, or simply using the bombs you were given a few screens earlier to prepare traps for the frogs. |
||
| Line 34: | Line 42: | ||
The dungeon boss, '''Halkantarus''', is a large, somewhat squidlike monster that descends from offscreen above to unleash minions upon you. Like the creatures in the room before, the boss cannot be directly targeted, and is intended to be beaten by firing ranged weapons at an ally mounted on the ladder in front of the boss. |
The dungeon boss, '''Halkantarus''', is a large, somewhat squidlike monster that descends from offscreen above to unleash minions upon you. Like the creatures in the room before, the boss cannot be directly targeted, and is intended to be beaten by firing ranged weapons at an ally mounted on the ladder in front of the boss. |
||
| − | Like the ULAKK, Halkantarus does not directly attack, and contact with him deals no damage. His attacks are solely based on releasing minions into the arena, with their numbers escalating as the fight progresses. The minions will be one of three types: '''bats''', who are released in waves of four, one in each |
+ | Like the ULAKK, Halkantarus does not directly attack, and contact with him deals no damage. His attacks are solely based on releasing minions into the arena, with their numbers escalating as the fight progresses. The minions will be one of three types: '''bats''', who are released in waves of four, one in each diagonal; '''frogs''', who are released onto the ground, with equal numbers facing (and moving in) each direction; and finally, '''kamikaze rats,''' who are released one at a time and will make a direct line towards the nearest target. |
This fight isn't terribly hard with a novice Fire spellcaster or archer on your team, as they're who the fight is intended for. As well, a practiced spearman with the Javelin skill can put down large chunks of damage, while using the adds to restore KP for further shots. Without a ranged option, the party will be stuck diving off an upper platform to score one hit at a time on the boss. |
This fight isn't terribly hard with a novice Fire spellcaster or archer on your team, as they're who the fight is intended for. As well, a practiced spearman with the Javelin skill can put down large chunks of damage, while using the adds to restore KP for further shots. Without a ranged option, the party will be stuck diving off an upper platform to score one hit at a time on the boss. |
||
Revision as of 01:53, 12 October 2017
Dungeon Map
"The search for the magic" is the second official multiplayer map, and is recommended for 3 players, Lv. 3 - 4.
Within this dungeon, the players will acquire their first spellbooks and spellcasting-related equipment.
Traps
There are 2 major traps in this dungeon.

Sometimes, you actually WANT to be by the lever.
Trap #1 is a lever trap that will drop a long row of stones on the players. The dungeon tries to fool you with a row of stones directly over the lever, but the trap is actually a row of stones that is not immediately visible, positioned directly over the area where you access the lower part of the room. All players should stand on the lever platform when it is pulled. This lever must be pulled in order to progress.

Choose wisely - or just keep moving.
Trap #2 is a lever trap with multiple levers; any of the three will activate the two traps overhead. One trap is three falling rocks, and the other is a rolling boulder that will roll rightwards, over the gap and out the right entrance of the map. The central lever is safe, as both traps will outright miss you. The right lever puts you in the path of the boulder, which you will not be able to avoid; the left one is directly beneath the falling rocks, leading again to unavoidable death. This trap may be skipped.
Loot
There is some significant loot to be found outside the final loot chamber, specifically in a handful of side areas that can be missed or skipped.
The first loot area is accessed by killing all the sea snakes within Room #11; two of the snakes are on a central, unreachable platform and must be killed with ranged attacks or spells. Once all snakes in the room are dead, a ladder will make the central platform reachable; from there you climb a long platform ladder up to a room containing four chests, a number of barrels, and three scroll stands, one of which will contain a Lv 4 spell or skill book. All chests and the book stand drop one item for all party members. Beware: the walking armor in this room is quite dangerous and will take an inordinate amount of damage before going down. It can, however, drop a suit of Plate armor for one player.
The second loot area requires a bit of backtracking. Once you've passed the room full of frogs, and climbed upwards, head to the left instead of the right. After a bit of platforming, you'll encounter a long ladder leading up to an armory. Inside there are four chests, and a door leading to a back area. Within the back area you'll find a guaranteed wand and ring, along with the highly desirable Architect's Tools, which allow you to create your own dungeons. The tools are a floating green symbol in the air; simply jump and touch that symbol to unlock them for your current character.
The third loot area is designated a kitchen, and is up the long ladder just before the boss chamber. Within you'll find coffins for respawning, a chest containing six hunks of Magic Cheese, and barrels with assorted contents.
The final loot chamber, after beating the boss, is where most of the money here is. Within you'll find 1 Amethyst Dolphin, a chest with a random robe, a chest with a random staff, a chest with a guaranteed unique wand, a ring, and of course, two random Lv 4 books. If you acquired the Red Key, an additional chamber can be opened, containing two rings, another robe and staff, and two more Lv 4 books. The barrels found within both chambers contain some of every flavor of Magic Essence.


")
")


Other Features
The dungeon contains other features that aren't entirely traps; one is a room where, upon pulling a lever, a multitude of frogs will fall from the sky and begin attacking. This is easily handled by a martial character, a well placed Arcane Wave, or simply using the bombs you were given a few screens earlier to prepare traps for the frogs.

Peek-a-boo!
Another is the room containing a Gurk Eye, a curious eyeball that will float in and out of a drainage pipe, evading attacks while it is within the pipe; graphically, the eye is smaller and less defined during the times that it 'hides'. Within a nearby door, there is a passage leading up to a gap where you may drop down and swing in hopes of hitting the eye. This puzzle is easiest solved with one person standing at the bottom, ready to cue your strongest single attacker to drop and strike the eye. The creature has ~100HP, so if you lack a strong single attacker, be prepared to take multiple passes.
If playing alone, it is noteworthy that the creature has a reasonably consistent timing of ~24sec between reveals; this should be enough, if counted correctly, for you to reach the top of the passage, and drop down to hit. Be prepared to take multiple passes, as the timing is not precise and has a factor of randomization to it, with a range of ~22 - 30sec.
Finally, in the room before the boss, you'll find a pair of monsters floating in a corner that cannot be targeted. The answer to this, as the game tells you, is to target a friendly and let fly with ranged attacks, directing the friendly to climb up or down the ladder in the center of the room to adjust aim. Once the creatures are dead, a ladder will appear that will give access to the Red Key; this key grants access to a secondary loot chamber after the boss.
Unlike many key challenges, this one can be done solo! If, during the course of the dungeon, you've picked up a Magic Wand or Wand of Firebolt, the wand will fire fast enough that you can hit the targets by going straight up and off the top of the ladder. Holding down fire as you climb will fire quickly enough to get the topmost target; from there, get your timing down and you can hit the second target as you fall. No other method seems to be fast enough to hit the targets, so make your shots count!
Boss: Halkantarus
The dungeon boss, Halkantarus, is a large, somewhat squidlike monster that descends from offscreen above to unleash minions upon you. Like the creatures in the room before, the boss cannot be directly targeted, and is intended to be beaten by firing ranged weapons at an ally mounted on the ladder in front of the boss.
Like the ULAKK, Halkantarus does not directly attack, and contact with him deals no damage. His attacks are solely based on releasing minions into the arena, with their numbers escalating as the fight progresses. The minions will be one of three types: bats, who are released in waves of four, one in each diagonal; frogs, who are released onto the ground, with equal numbers facing (and moving in) each direction; and finally, kamikaze rats, who are released one at a time and will make a direct line towards the nearest target.
This fight isn't terribly hard with a novice Fire spellcaster or archer on your team, as they're who the fight is intended for. As well, a practiced spearman with the Javelin skill can put down large chunks of damage, while using the adds to restore KP for further shots. Without a ranged option, the party will be stuck diving off an upper platform to score one hit at a time on the boss.
It is noteworthy that Frost magic has no apparent effect on the boss, and therefore is inadvisable to use.
If playing alone, use the bats for targeting purposes! Their flight path up and around the boss gives ample time to lay damage down on the creature. Just be wary of the kamikaze rats, as they WILL kill you in one hit, forcing you to restart the fight.
Bestiary
- Poison Ball
- Tentacle
- Frog
- Sea Snake
- Kamikaze Rat
- Gurk Eye
- Bats (with an unusual, ethereal-looking skin)